PRO: Inventory Management - Working with Catalog Groups (PRO Market)
![]() Updated
Updated
Working with Catalog Groups
Catalog Groups are a way to organize your products to make it easier for your clients to find what they want. Follow this workflow to create catalog groups of products to be displayed in the marketplace portal.
In the Inventory Management > Catalog Groups, you can create different groups of products that will be visible in your online Marketplace. Below is an example that shows Product Groups that have been built out with product images.
To create a new Catalog Group from the Catalog Groups screen,
- Click “+ Add New Catalog Group” in the top right corner.
- A new screen will appear with the following fields to fill in: Catalog Name (group name) and Product Name.
- The catalog name should be more general because it refers to a group of items.
- The product name will link to a specific product that already exists in your system.
- After entering the catalog name you can begin typing a product name in the field that says “type product name…” and a list of existing matches will appear for you to select from, based on your text entry.
- You can use the “Continue Adding” checkbox to add more selections to the Catalog Group.
- When you have finished selecting products to add, click “Add Catalog Group” to complete the process.
Once a product has been added to the group an “orange box” icon will appear next to the product on the Manage Menu screen.
Hover your mouse pointer over the icon to view the Catalog Group that the product is associated with.
Another way to add Products to a Group is to right-click a selection of Products on the Inventory Management > Manage Menu screen and select “Add to Catalog Group” from the menu.
In the following dialog box you will be able to “Add to Existing Catalog Group” or “Add to New Catalog Group”.
If you choose “existing” you’ll see a drop-down arrow with a list of the groups you’ve already created.
If you choose “add new” you will be able to create a new group by entering its name in the “Catalog Name” text box, as seen below.
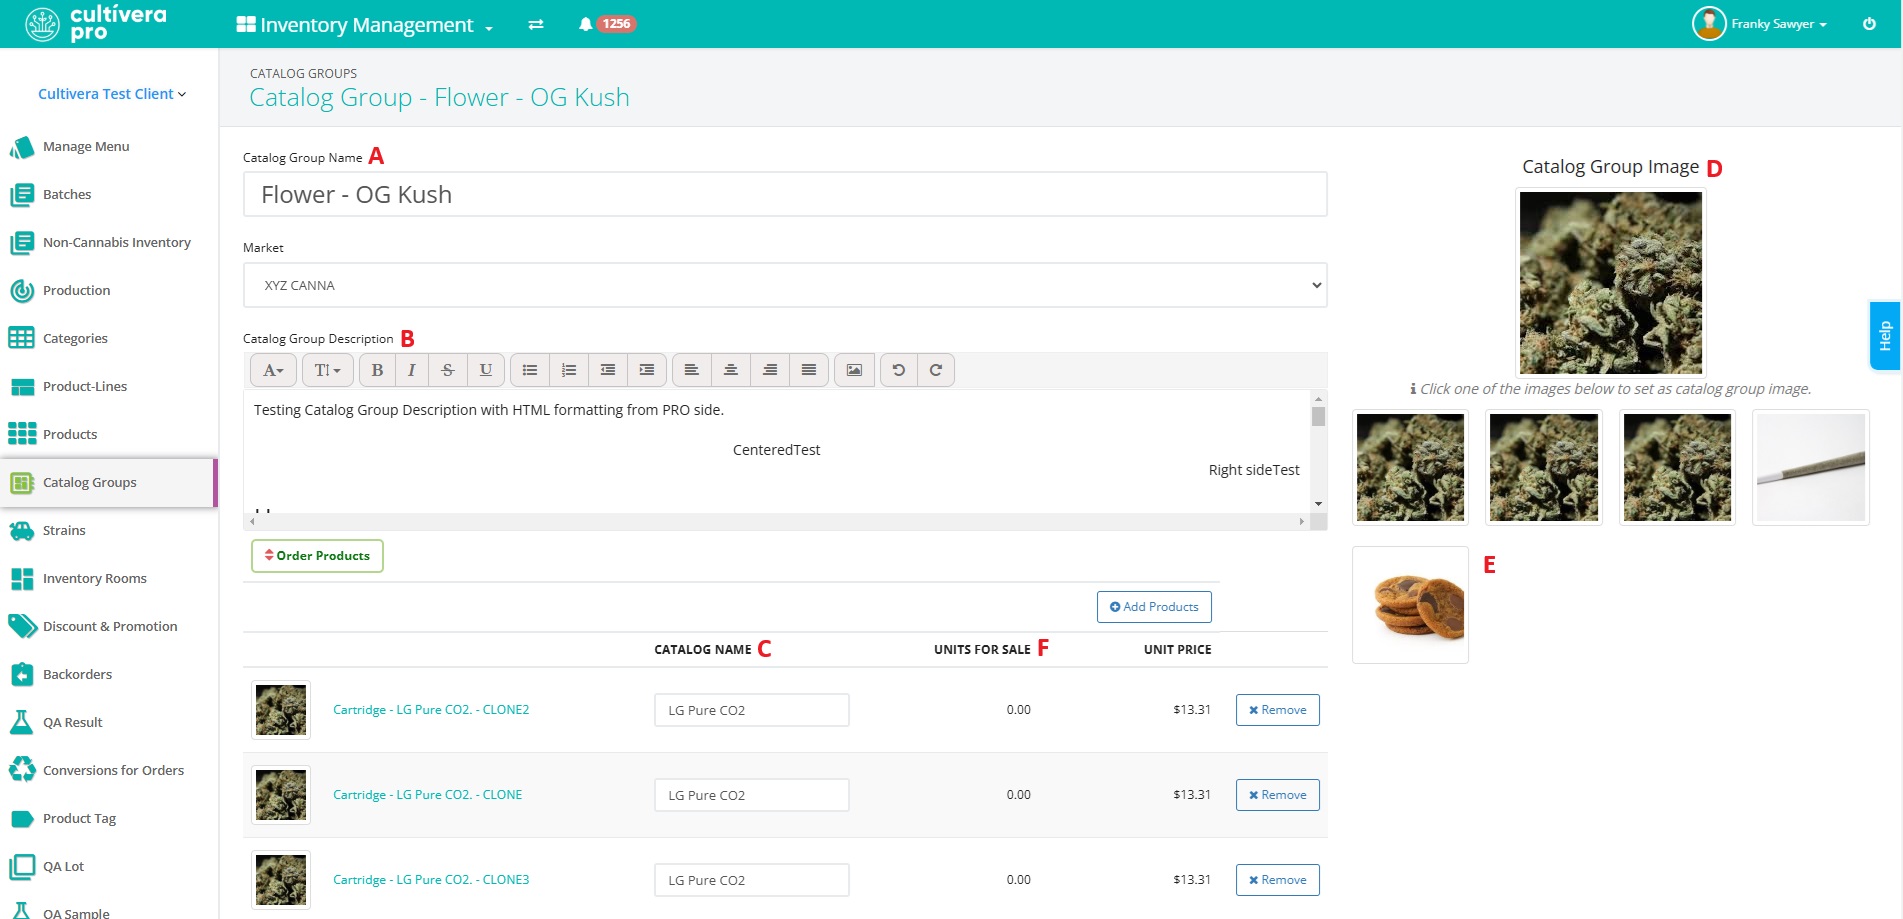
Once you’ve added your products the next step is to configure your Catalog Group.
Refer to the image below:
A. Catalog Group Name – this field will be displayed to the buyer in the order portal to denote the group of products within the order portal
B. Catalog Group Description – you can populate this section with content relevant to products in this catalog group. For example, you can attach images, strain information, etc.
C. Catalog Name – This field designates the text that will appear in the order portal to the buyer for each individual product in the order portal
D. Catalog Group Image – This image is displayed in the order portal to represent the entire Catalog Group
E. Group Image Selection – This area contains thumbnails of any images available to be selected as the Catalog Group Image. To be available in this area, an image must first be uploaded on the product details page of a product that is contained within this Catalog Group. (See related: How to Add an Image to a Product Page)
F. Units for Sale - This field shows any 'Units for Sale' for that given product; this takes into account any units excluded via the new "Exclude Batches from Market".
Once all necessary alterations have been made, click Save Changes to update the group with the new information.
Once your Catalog Group has been created and configured you can use the buttons at the top right of the Catalog Groups page to generate a printable catalog for customers to view, or you can export the group information to an Excel spreadsheet if desired.