PRO: Inventory Management - Creating a Bill of Materials and Completing a Production Run
 Updated
Creating a Bill of Materials and Production Run
The Production page gives you the ability to create production runs for converting one product into another. Examples include packaging bulk flower into pre-packed flower units and converting trim, flower, or oil into concentrates, edibles, or other products.
The first tab on this page is for the Bill of Materials, which is a “recipe” for the product you are producing. It stores the input and output inventory types you’re converting and can be used for multiple production runs or conversions.
You can have several different Bills of Materials or Product Bills of Materials stored as templates for different output types/products.
Creating A New BOM
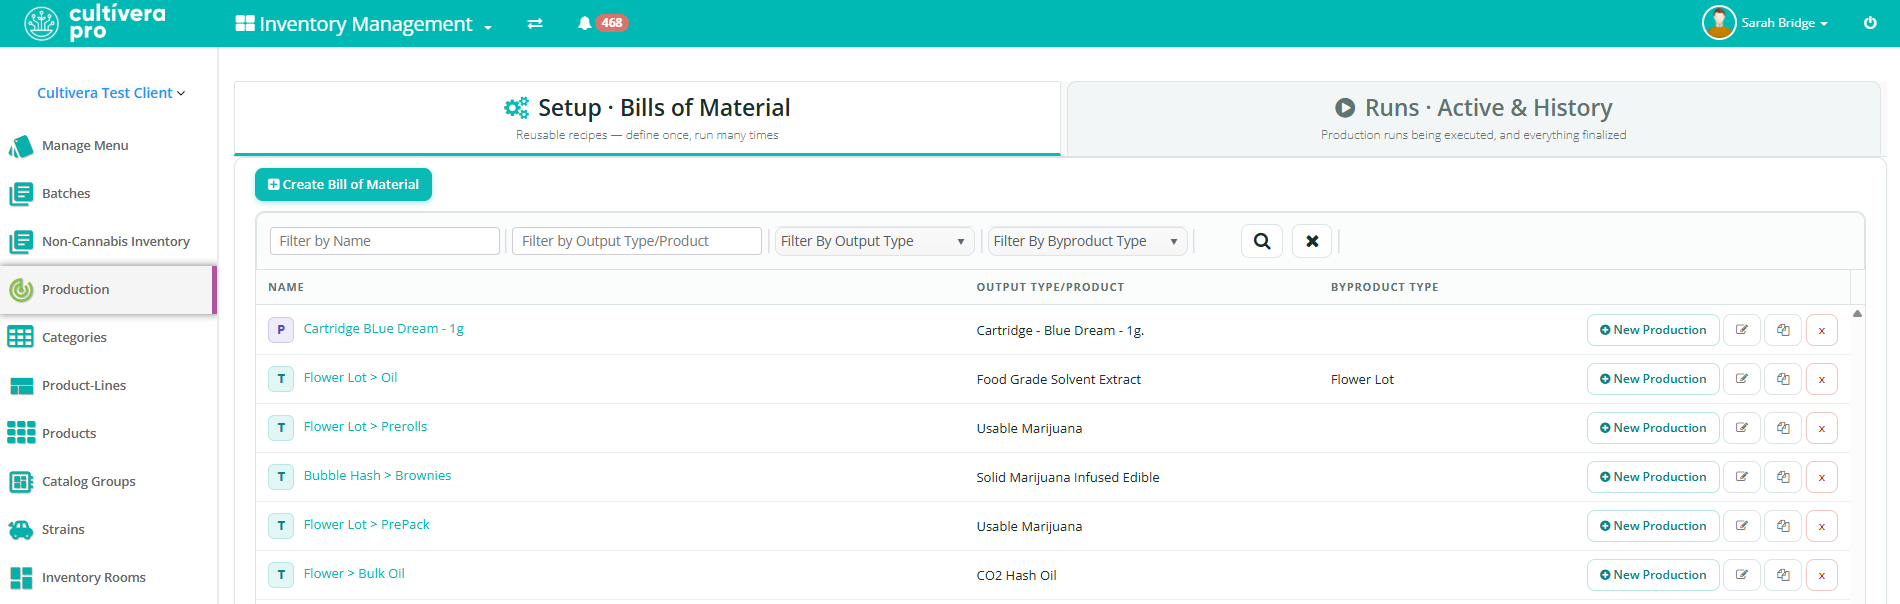
- Navigate to Production > Setup - Bill of Materials.
- Select the “Create Bill of Material” button on the top left.
- Select the intended Bill of Material Type ("By Inventory Type" or "By Exact Products")
- By Inventory Type - this is the recommended workflow that covers every product that shares the chosen inventory type
- By Exact Products - this setup is specific to products only (not inventory type). This requires a new BoM for every product you make this way.
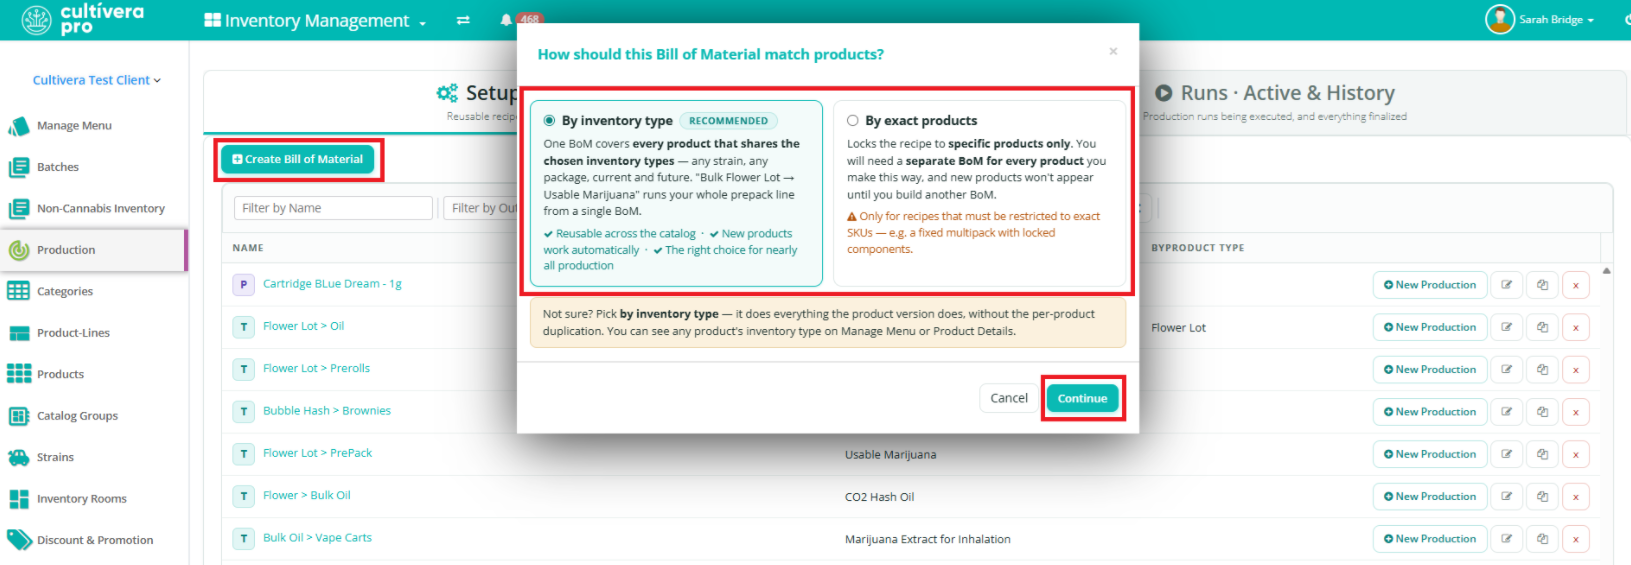
- Once the intended Bill of Materials setup type has been selected, select "Continue".
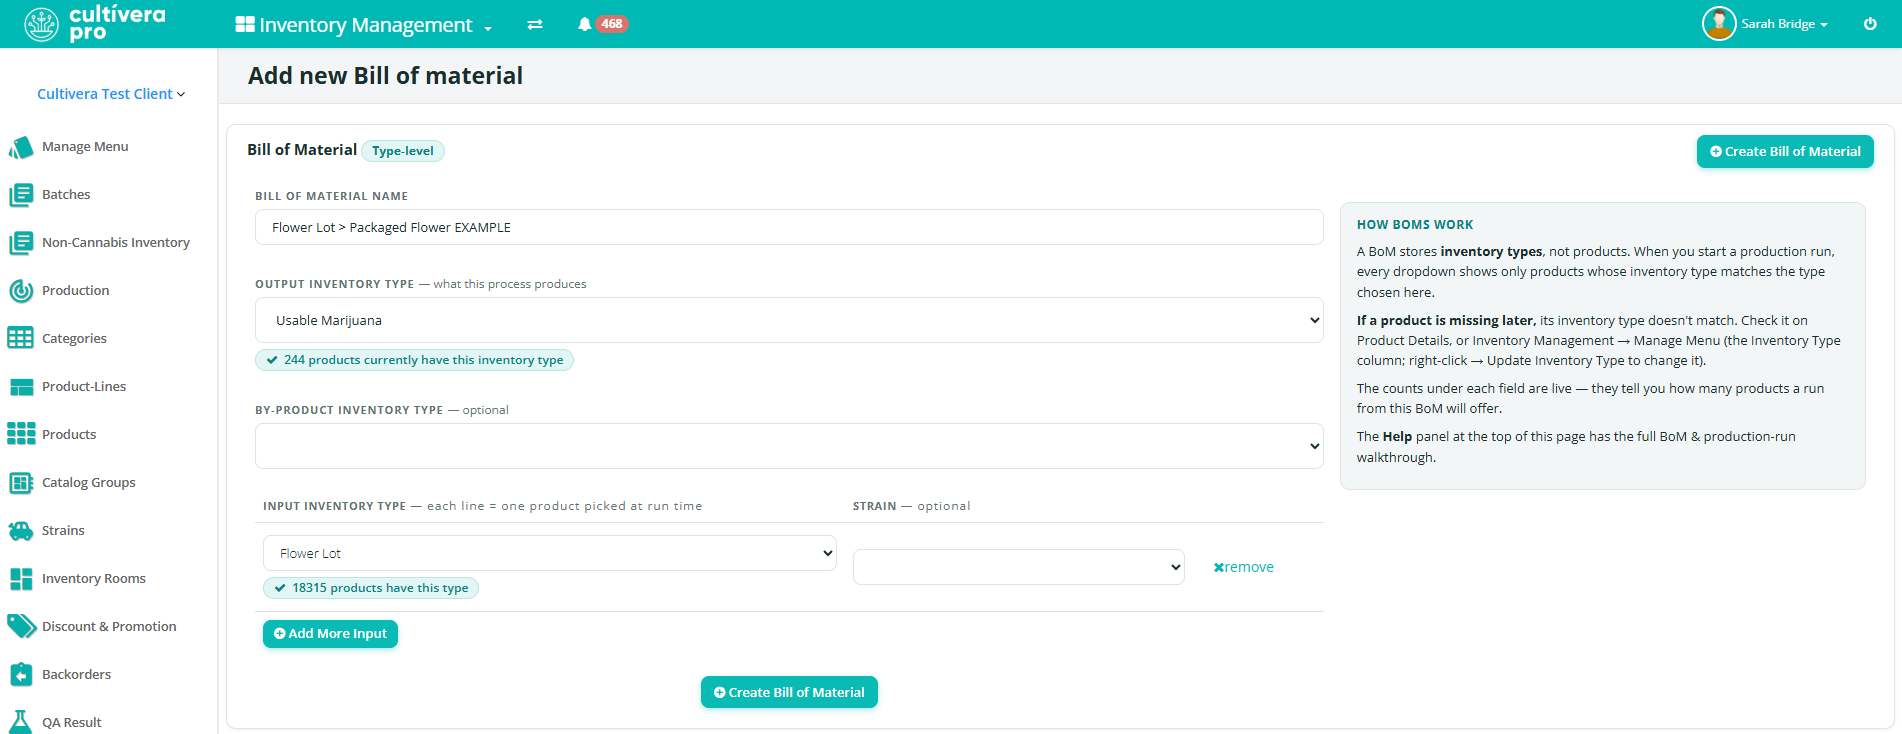
- Enter a name for the Bill of Materials that describes what is being processed (such as Flower Lot > Packaged Flower).
- Select an output inventory type for the conversion process.
- In the second dropdown field, select the input product type(s) from the dropdown menu. You can add as many inputs as you need by clicking “+ Add More Input”.It’s a good idea to remove any empty fields that are not in use by clicking the "remove" link.
- Once you have configured the required fields, click “+ Create Bill of Materials” and your new Bill of Materials will be accessible from the main Production page.
New Production Runs
You can begin a Production Run by following these steps.
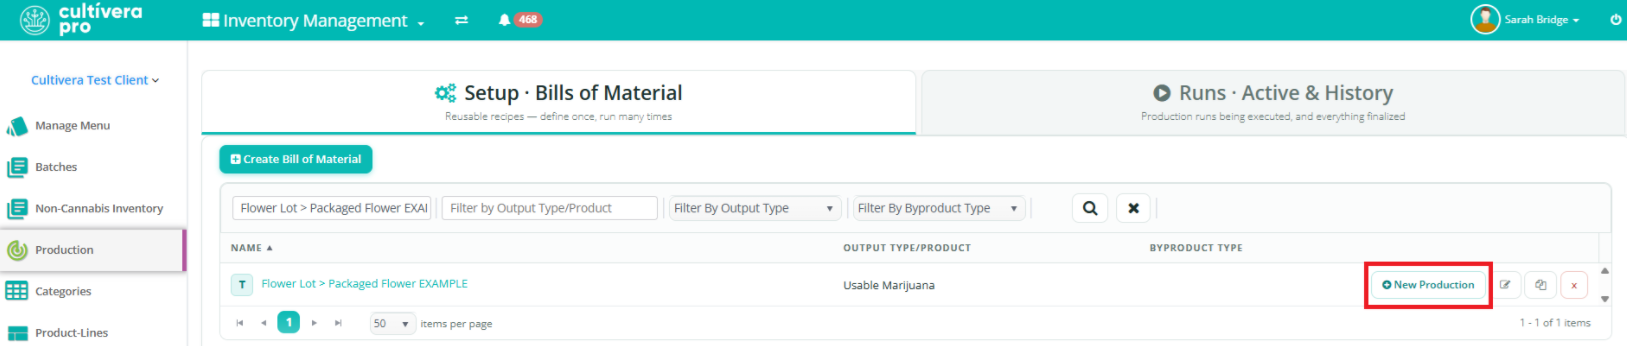
- Navigate to Inventory Management > Production and click the “+ New Production” button next to the Bill of Materials that you want to use.
- The New Production Run screen is where you’ll select the specific output product and input product you’re working with.
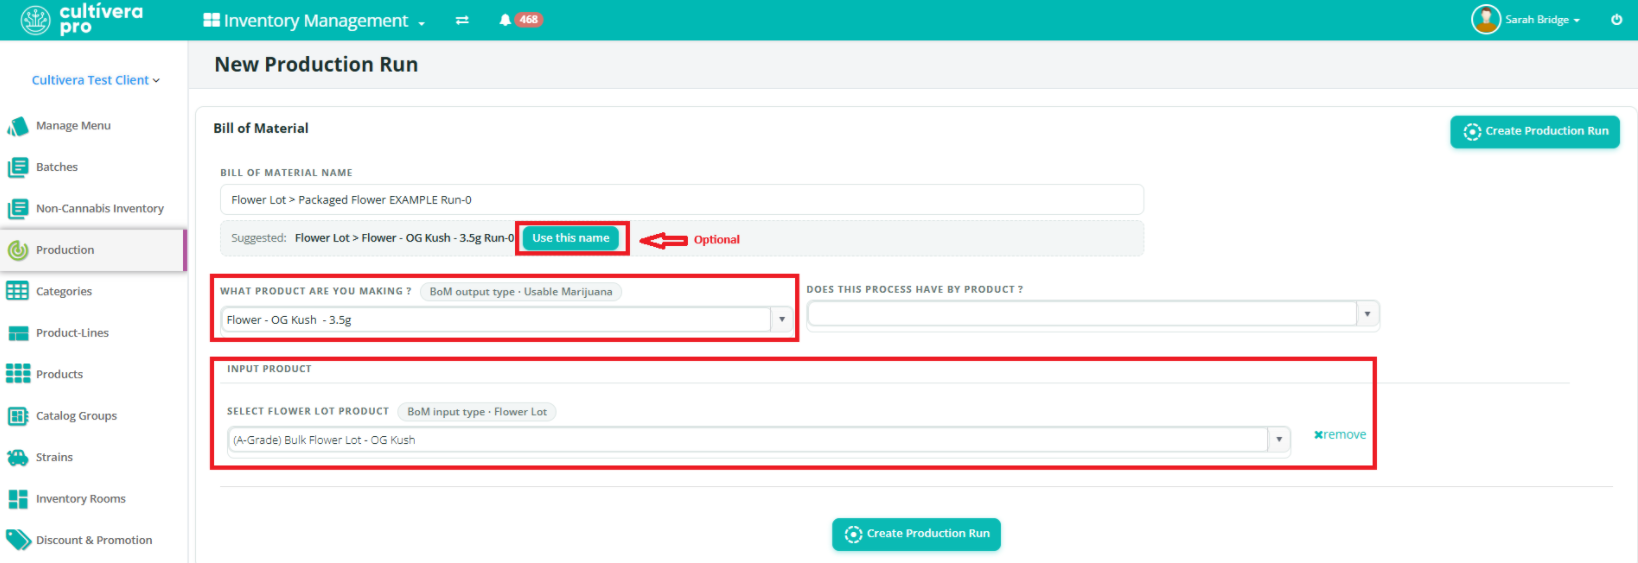 It is helpful to name the production run after the bulk input and finished output product you’re making, so it can be found easily later in case you want to do a “Re-run” of the same product. Once the input/ouput products are selected, a recommended name will populate that can be used if desired.
 - When you are finished adding the output and input products, click “Create Production Run”.
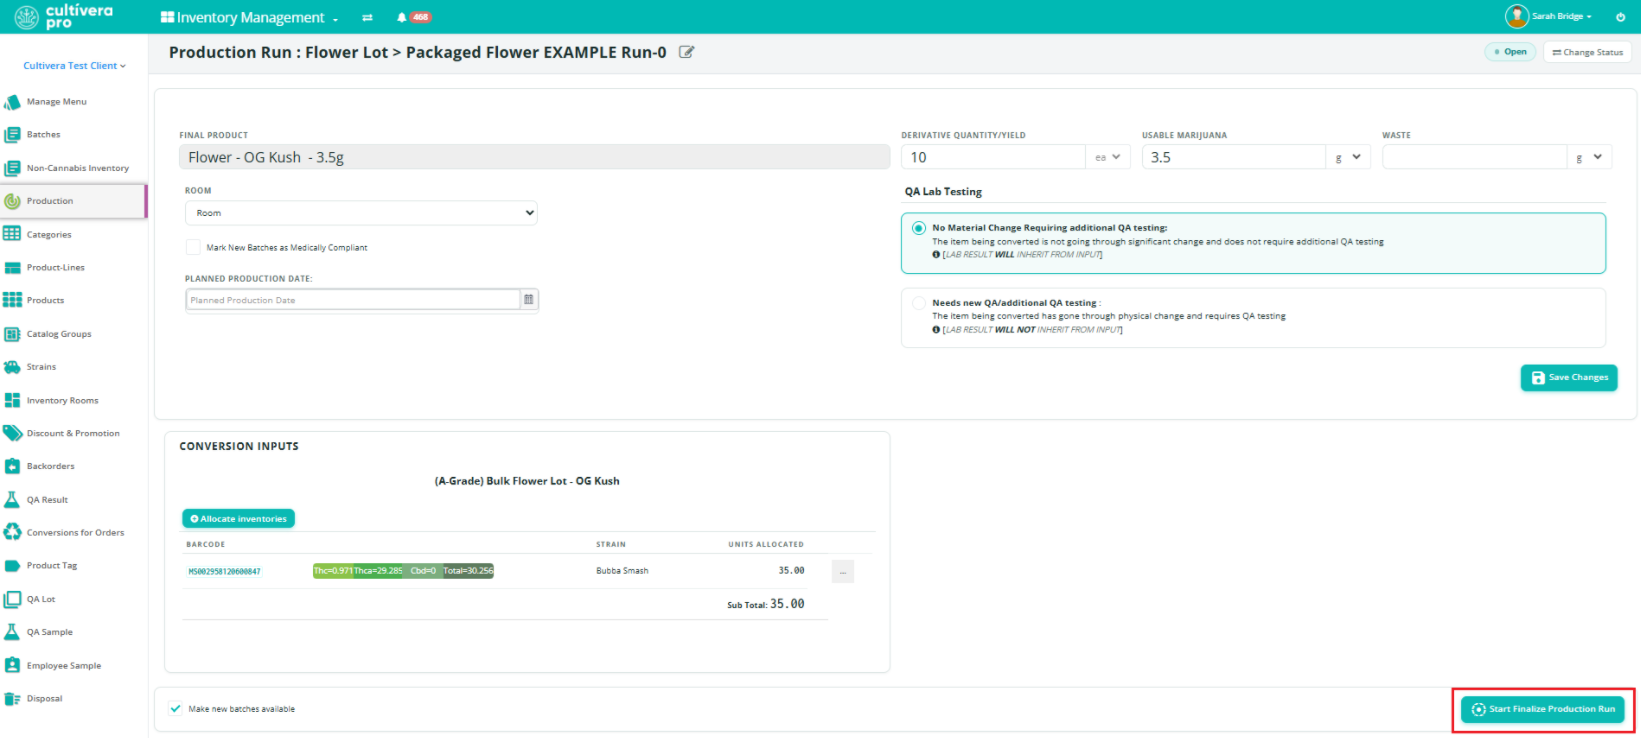
- You will be taken to the Production Run screen where you’ll add your allocation and yield for the run.
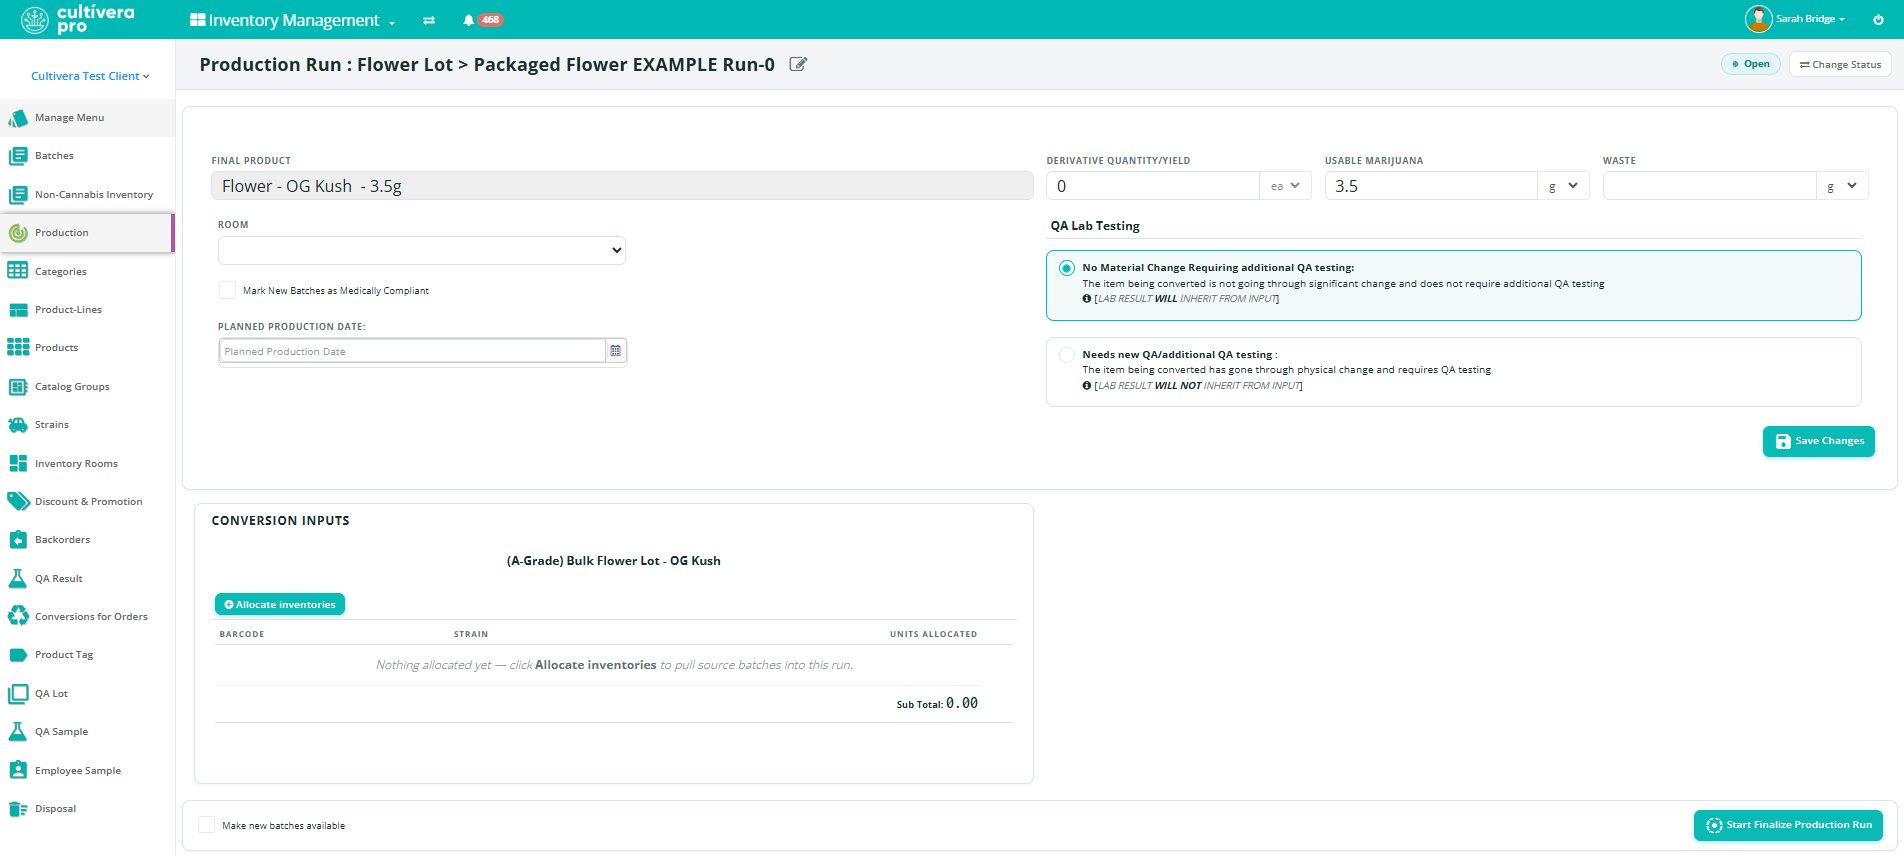
- The first data entry field is “Derivative Quantity/Yield”. Enter the yield by inputting either the weight or the number of units you converted, accounting for any waste as needed (if there is no waste to record, this field can be left blank).
- Choose whether the new product will require QA testing based on the laws in your area. Typically, a product will require testing if it changes physical form, such as converting from trim to concentrate. If you are repackaging something that has already been tested, selecting “No Material Change Requiring Additional QA Testing” will allow the test results to carry over from the source package, also known as the “QA Parent”.
- Using the dropdown menu on the left, select the Room where the inventory will be stored after the conversion is complete. The Planned Production Date is optional, but can be useful if you plan on allocating material to a run you’ll do in the future.
- Mark New Batches as Medically Compliant will automatically mark the output batch as DOH Compliant (specific to WA state).
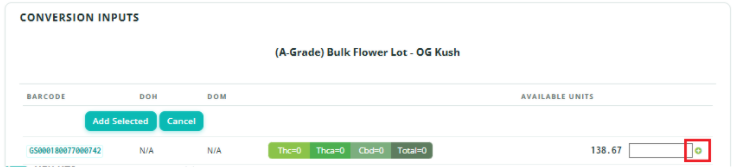
- In the bottom section of the screen, you’ll enter your Conversion Input(s), which are the source batches you’re using for the production run. Verify the correct inventory item description is visible and click “Allocate Inventories” to select which batch to use. Enter the number of grams/unit you’re using from the original batch, then click “Add Selected” to allocate the weight.Tip: If you’re using the entire batch, you can select the full amount of the batch by clicking the green plus sign, then choose “Add Selected”.
- To automatically make the finished production batch available in inventory, select the "Make new batches available" checkbox, then click “Finalize Production Run” to complete the process.
Often batches aren't made available until after testing has been added, so if you don’t select the checkbox, you’ll be able to navigate to Inventory Management > Batches to make the new batch available, as well as to enter test results.
***If you are in a state that uses Metrc traceability tags, the following dialog box will allow you to select the next available tag that will be applied to the finished product.
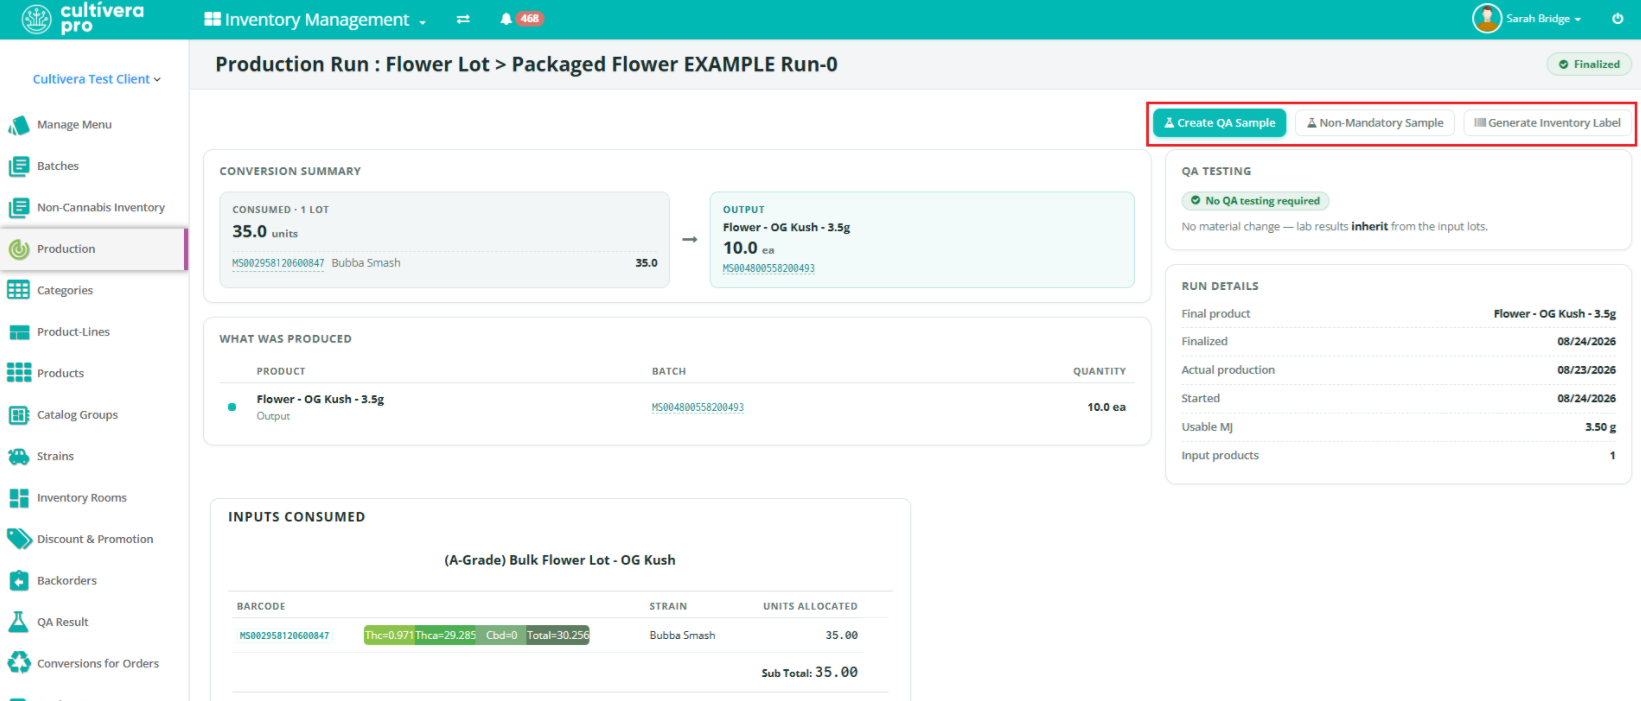
Once the Production Run is complete, you’ll see a confirmation screen, and the new barcode ID assigned to the new batch will show in the Production Run summary section.
- Use the "Create QA Sample" button to create a Mandatory QA Sample (if new testing is required).
- Use the "Non-Mandatory Sample" button to create a Non-Mandatory QA Sample (as needed).
- Use the "Generate Inventory Label" button at the upper left of the screen to create an inventory label for the completed batch so it can be tracked in your warehouse.
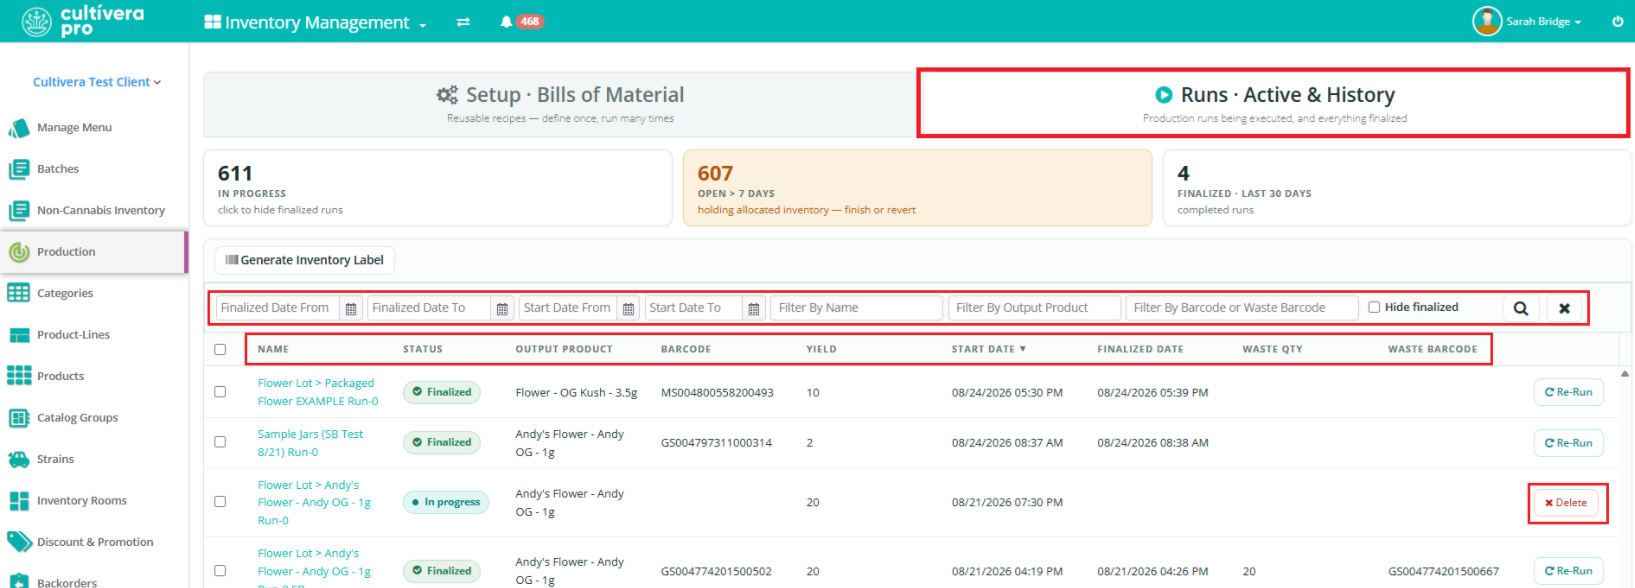
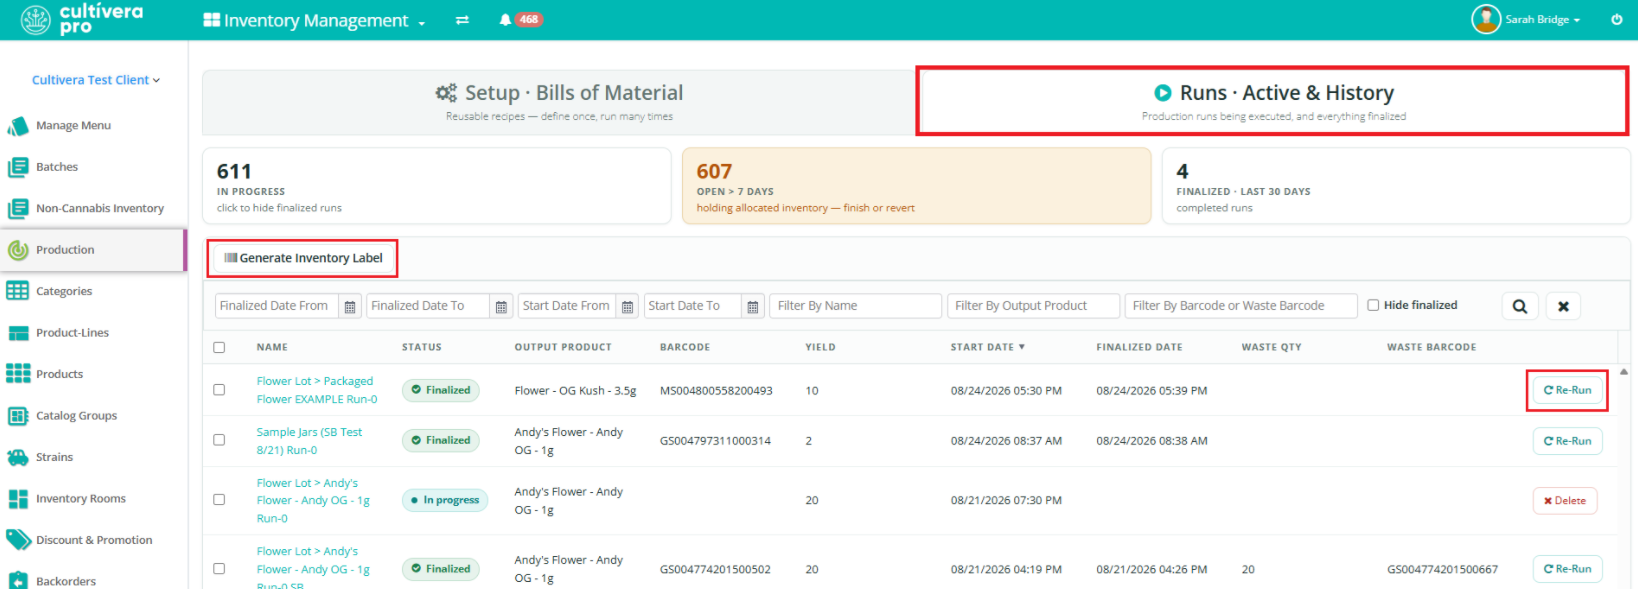
Details about your run can also be found on the “Runs - Active & History” tab at the upper right of the main Productions page. This is also where you can generate inventory labels for output products and do “re-runs” of any previous production runs using the green “Re-Run” buttons on the right.
The Batch that you just created can now be found on the Inventory Management > Batches screen.
Viewing Historical Production Details
You can search for previous conversions using the filters across the top of the Runs - Active & History tab. You can also sort by any of the column headings, such as the production dates or output product.
If there are unused or incomplete production runs, they can be selected and deleted by using the “Delete” button. Note: You cannot delete a finalized production run.